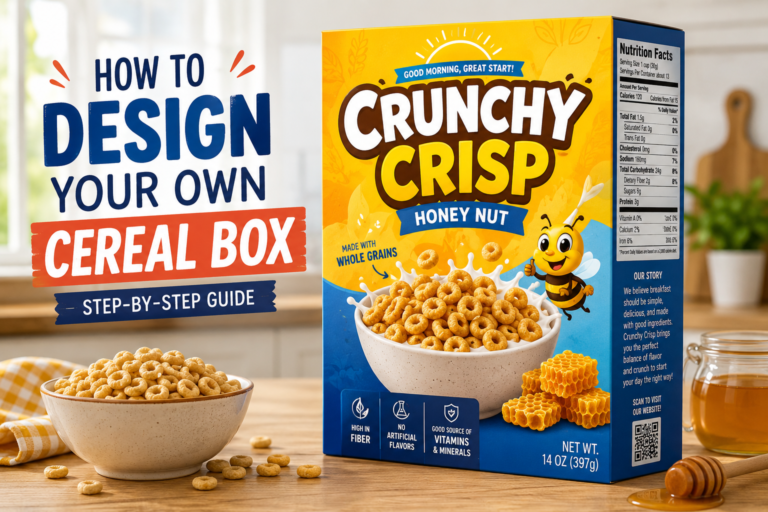
Cereal Box Design Project Geometry: 7 Powerful Ideas for a Creative Math Project
Cereal box design project geometry sounds simple at first. You take a cereal box, measure it, maybe decorate it, write a few numbers… done, right?
Not really.
This kind of project can actually become one of the most creative ways to understand geometry. It brings together math, design, measurement, packaging, branding, and a little bit of imagination. And honestly, that’s why students usually enjoy it more than a normal worksheet. A cereal box is something familiar. Everyone has seen one in the kitchen, on a grocery shelf, or maybe half-opened on the breakfast table.
But when you look at it through geometry, it becomes more interesting.
A cereal box is not just a box. It is a rectangular prism. It has faces, edges, vertices, length, width, height, volume, surface area, and a net. And if you are doing a design project, it also has colors, labels, product names, nutrition panels, logos, and front-cover appeal.
So yes, math and creativity can sit together. Pretty nicely, actually.
What Is a Cereal Box Design Project Geometry Activity?
A cereal box design project geometry activity is a classroom or homework project where students design, measure, build, or redesign a cereal box using geometry concepts.
The main goal is to understand how 3D shapes work in real life.
Students may have to:
- Measure the length, width, and height of a cereal box
- Calculate volume
- Find surface area
- Draw or create a 2D net
- Design their own cereal brand
- Compare box sizes
- Build a new box from paper or cardboard
- Explain why their design is useful, attractive, or cost-effective
And the best part? It does not feel like “just math.” It feels like a small product design challenge.
Why This Project Works So Well
Geometry can feel boring when it stays only on paper. But once students hold an actual box, fold it, open it, flatten it, and measure it… things click.
A cereal box design project helps students see that geometry is everywhere. It is in packaging. In shipping. In grocery shelves. In advertising. Even in how much cereal a box can hold.
Here is a simple way to understand it:
| Geometry Concept | How It Appears in a Cereal Box |
|---|---|
| Rectangular Prism | The normal cereal box shape |
| Volume | How much cereal the box can hold |
| Surface Area | How much cardboard is needed |
| Net | The flat pattern of the box |
| Faces | Front, back, sides, top, and bottom |
| Edges | The lines where two faces meet |
| Vertices | The corners of the box |
| Design Layout | Where the logo, title, image, and labels go |
This is why the project is great for middle school and high school students. It teaches formulas, but not in a cold way. There is a real object in front of you.
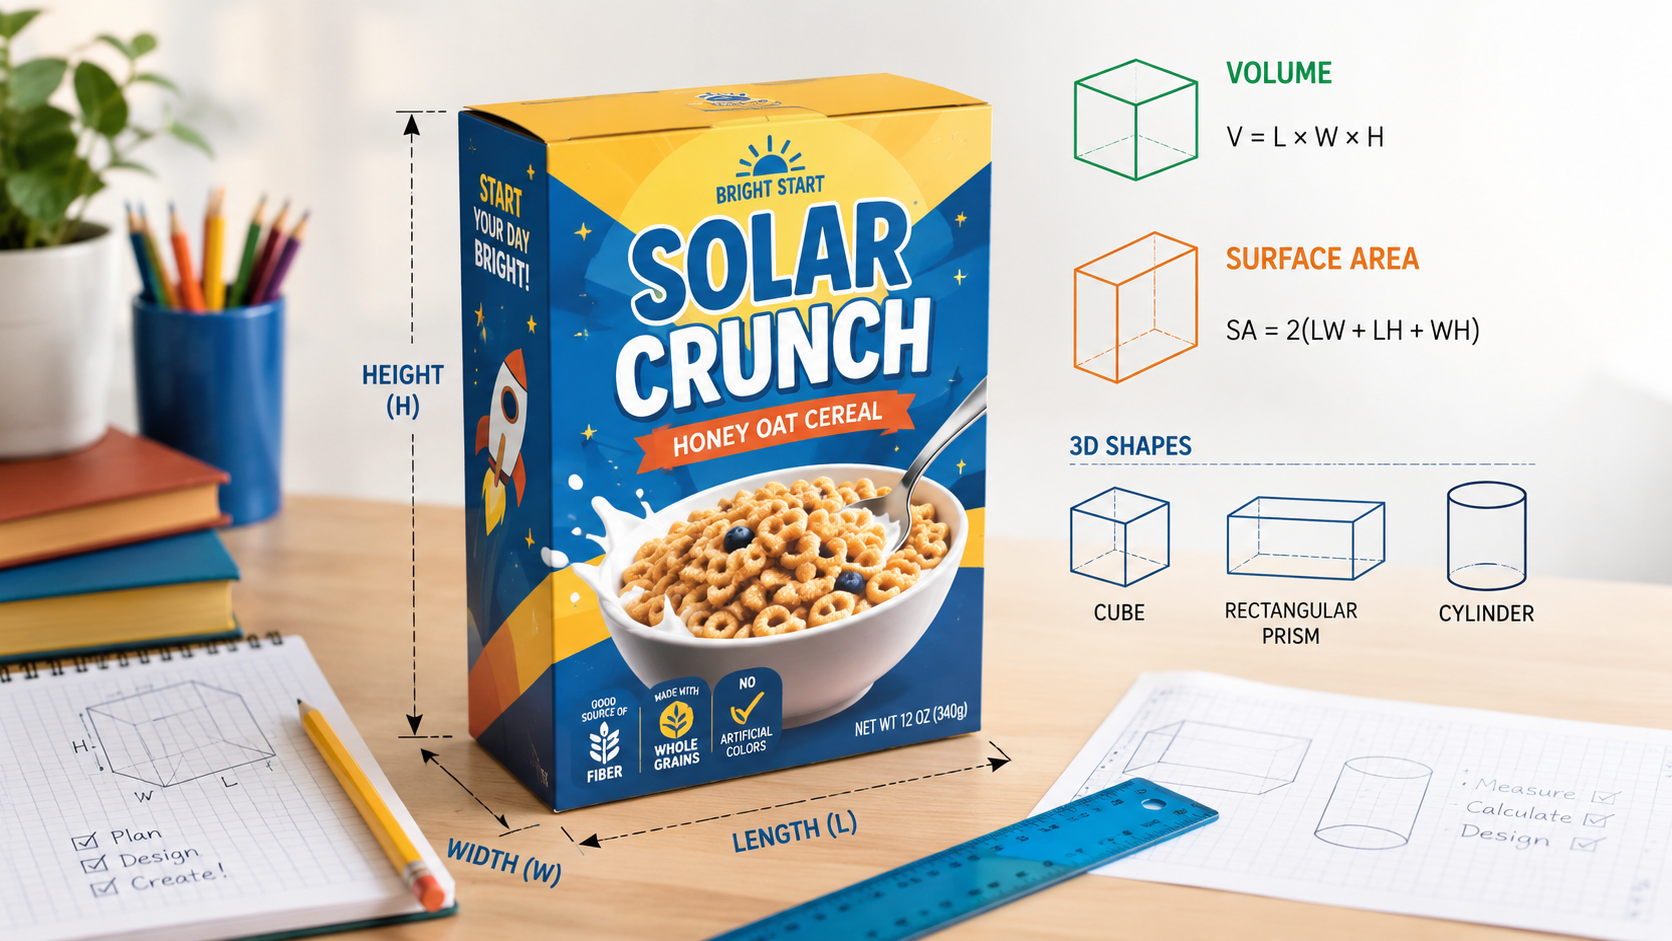
1. Start With the Basic Shape
Most cereal boxes are rectangular prisms. That means they have six rectangular faces.
Before designing anything, students should identify the parts of the box:
- Front face
- Back face
- Left side
- Right side
- Top
- Bottom
Then measure the box using a ruler.
A common example might look like this:
- Height: 12 inches
- Width: 8 inches
- Depth: 2 inches
Now the box is not just a cereal box anymore. It is a 3D shape with numbers attached to it.
And that is where the math starts.
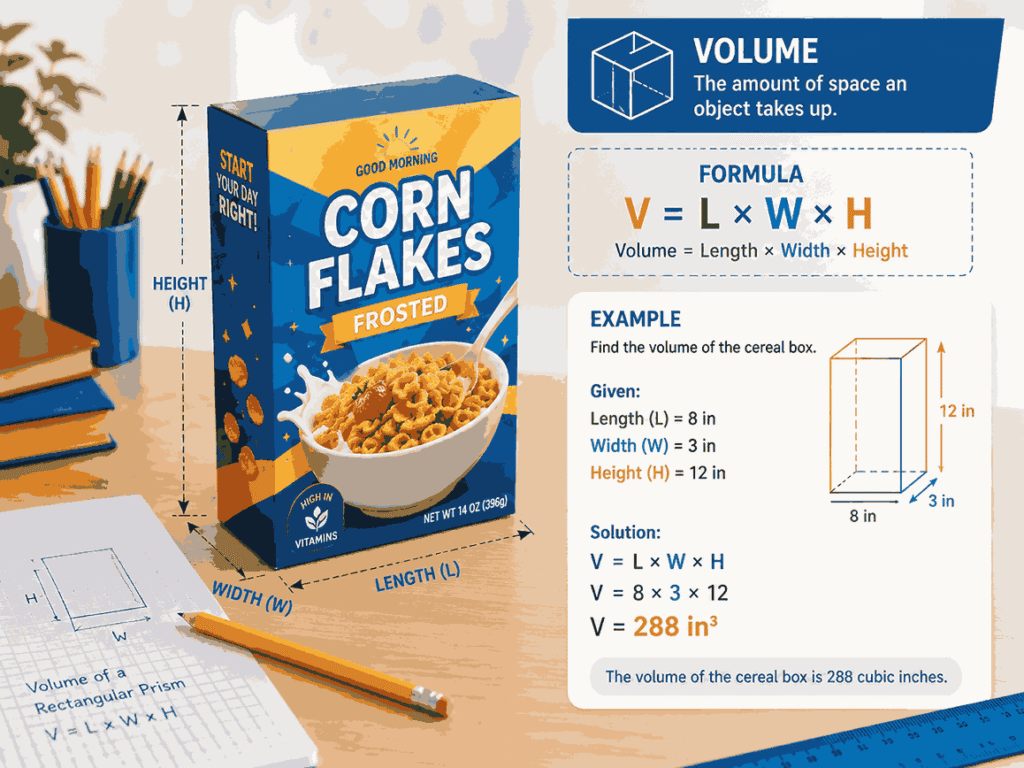
2. Calculate the volume.
Volume tells us how much space is inside the box. In simple words, it answers this question:
How much cereal can this box hold?
For a rectangular prism, the formula is:
Volume = Length × Width × Height
So if the cereal box is 12 inches tall, 8 inches wide, and 2 inches deep:
Volume = 12 × 8 × 2 = 192 cubic inches
That means the box has 192 cubic inches of space inside.
Of course, real cereal packaging may also include an inner bag, air space, folds, and other small details. But for a school geometry project, this formula works well.
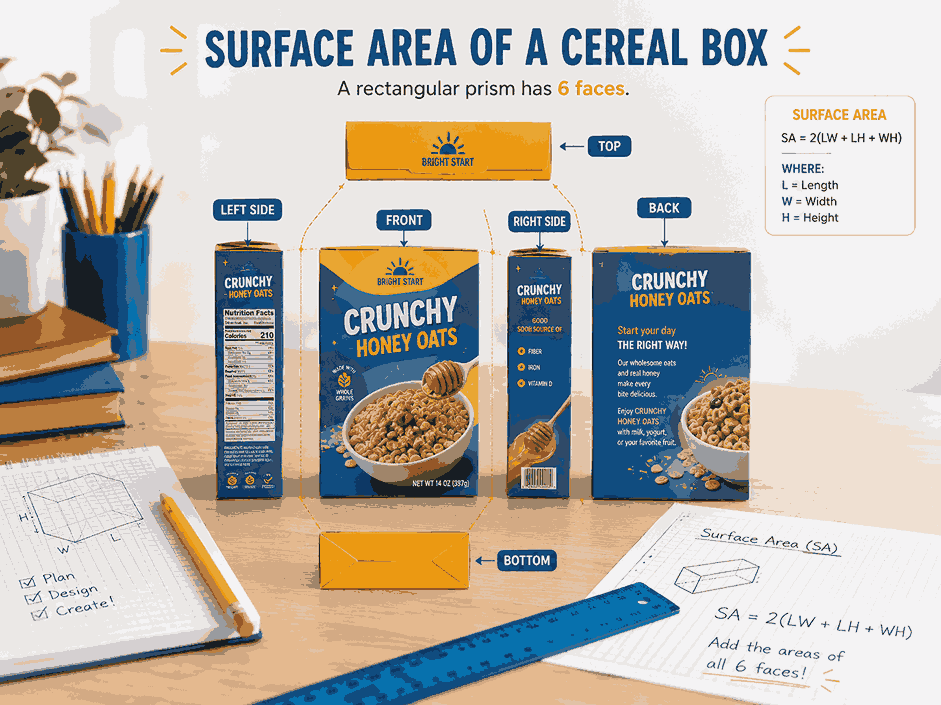
3. Find the Surface Area
Surface area is about the outside of the box.
It answers another important question:
How much cardboard is needed to make this box?
The surface area formula for a rectangular prism is:
Surface Area = 2lw + 2lh + 2wh
Where:
- l = length
- w = width
- h = height
If students are confused, they can also find the area of each face separately and then add them all together. Sometimes that feels easier.
For example:
- Front and back faces
- Left and right sides
- Top and bottom faces
This part is really useful because it connects math with packaging cost. A box with a bigger surface area may need more cardboard. More cardboard can mean more cost. So a company would care about this.
And suddenly, the formula has a purpose.
4. Create a 2D Net
This is one of the most fun parts of the cereal box design project geometry activity.
A net is what a 3D shape looks like when it is unfolded flat.
If students carefully open a cereal box and flatten it, they can see all the faces connected together. It almost looks like a strange puzzle. But it is actually the flat version of the box.
Students can draw their own net on paper and label each part:
- Front panel
- Back panel
- Side panels
- Top flap
- Bottom flap
This step helps students understand how flat shapes become 3D objects. And it is also useful for planning the design. Where should the cereal name go? Where should the ingredients go? Where should the mascot or product image be placed?
Small choices, but they matter.
5. Add Creative Packaging Design
Now comes the part most students love — making the box look real.
A cereal box should not only be mathematically correct. It should also look like something people might actually pick up from a shelf.
A good cereal box design may include the following:
- A catchy cereal name
- A bold title on the front
- Bright or balanced colors
- A mascot, pattern, or food image
- Nutrition facts
- Ingredients section
- Barcode
- Serving suggestion
- Short slogan
- Fun activity on the back panel
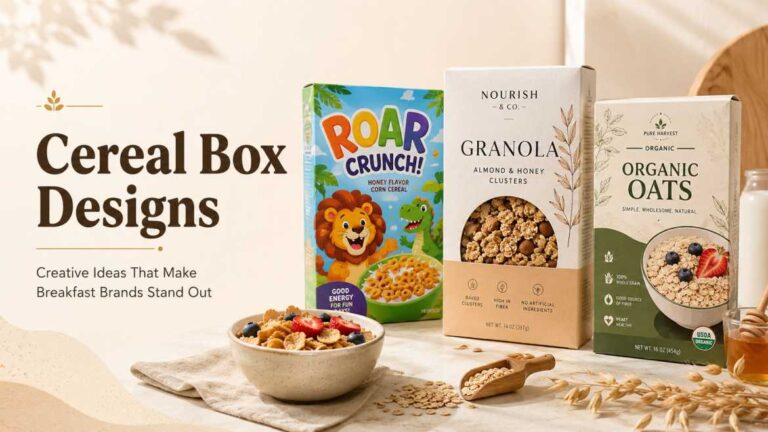
For example, a kids’ cereal box might use bright colors, cartoon-style artwork, and playful fonts. A healthy cereal box might use soft colors, clean typography, grain images, and words like “whole grain” or “natural.”
But don’t overdo it. A crowded design can look messy. Leave some breathing space.
6. Try a Different Geometry Shape
A normal cereal box is a rectangular prism. But for a more advanced or unique project, students can redesign the cereal container using a different 3D shape.
Some creative shape ideas include:
- Triangular prism cereal box
- Cylinder cereal container
- Square pyramid mini cereal pack
- Hexagonal prism box
- Cone-shaped promotional cereal pack
This makes the project more challenging because students must think about how the shape affects volume, surface area, storage, and shelf display.
A cylinder may look cool, but is it easy to stack?
A pyramid may stand out, but does it hold enough cereal?
A triangular prism may be creative… but will it waste shelf space?
These are good questions. Real design questions.
7. Compare Design Choices
A strong cereal box geometry project should include a short explanation. Not a huge essay. Just enough to show the thinking behind the design.
Students can compare:
- Which box has more volume?
- Which design uses less cardboard?
- Which shape is easier to build?
- Which one looks better on a shelf?
- Which one is more cost-effective?
- Which design is best for the target audience?
Here is a simple comparison table:
| Box Design | Volume | Surface Area | Best Feature | Possible Problem |
|---|---|---|---|---|
| Tall rectangular box | High | Medium | Easy to stack | May tip over |
| Wide rectangular box | Medium | Medium | Stable shape | Takes more shelf space |
| Cylinder container | Medium | Lower/varies | Looks modern | Harder to create from paper |
| Triangular prism | Lower/medium | Varies | Unique design | Less common for cereal |
This kind of table makes the project look more complete. And yes, teachers usually like that because it shows actual analysis.
After understanding the geometry part, you can also learn how to design your own cereal box with colors, fonts, panels, and mockups.
Easy Step-by-Step Project Plan
Here is a simple plan students can follow:
- Pick an existing cereal box or decide your own size.
- Measure length, width, and height.
- Calculate the volume.
- Calculate the surface area.
- Draw the net of the box.
- Design the front, back, sides, top, and bottom.
- Add brand details like name, logo, slogan, and nutrition facts.
- Build the box using paper, cardstock, or cardboard.
- Write a short explanation of your math and design choices.
- Present the final cereal box.
Simple. But still detailed enough.
What to Include on the Final Cereal Box
To make the project look polished, students should include both math and design elements.
Checklist:
- Cereal brand name
- Product slogan
- Front cover design
- Back panel activity or information
- Nutrition label
- Ingredients list
- Barcode
- Net drawing
- Volume calculation
- Surface area calculation
- Dimensions clearly labeled
- Short design explanation
And please, check the measurements. One wrong number can throw off the whole calculation.
Common Mistakes to Avoid
A few mistakes happen again and again in this project.
Students often forget units. They write “192” instead of “192 cubic inches.” That small thing matters.
Some students mix up surface area and volume. Surface area is outside. Volume is inside.
Another common mistake is designing only the front of the box and leaving the sides blank. But real packaging uses all panels. Even the side panel has a job.
Also, the net must actually fold into the box shape. A pretty net that cannot fold properly is… well, not very useful.
Final Thoughts
A cereal box design project geometry activity is a smart way to make math feel real. Students don’t just memorize formulas. They use them. They measure, calculate, design, fold, compare, and explain.
And that is what makes the project powerful.
It combines geometry with creativity in a way that feels natural. A cereal box becomes more than breakfast packaging. It becomes a lesson in volume, surface area, nets, 3D shapes, and design thinking.
Not bad for something that usually sits on a kitchen shelf.